

PLEASE SELECT THE DESTINATION COUNTRY AND LANGUAGE :

| Self-production |
| 한국 |
| $42.00 |
| P00000PE |
  |

| Select item with details above |
| Name | Quantity | Price |
|---|---|---|
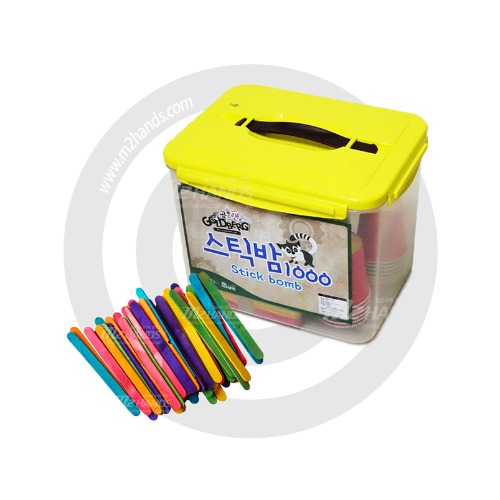
| stickbomb swich / Science Books / Science Tools / After School Tools / Science Making |


|
42 ( 0) 0)
|
Discounted amount of your subtotal will appear when you place your orders.
*Because this product is a stick bomb switch product sale page, stick bomb is excluded from a product structure. (Stick bomb can be purchased separately)
Material
wood
Components
<Wood board material>
Switch board, Front board, Side board(1,2), Back board, Top board, Top handle, Middle handle, Bottom handle
Launch board(side1,2), Launch board(middle), Fixed board
<Part>
75mm Spring hinge, Hex Bolt 30mm X 2, Hex Bolt 20mm X 5, Hex Bolt 12mm X 22, Nut 4mm X 29
Hex wrench, Bracket X 9, Spring
Size
19.5 horizontal X 23.5 height X 19.5 depth (cm)
1 step. Assemble the handle
① Overlap 3 sheets in the order of top -> middle-> bottom and fix it with hex bolts and nuts.
② Insert the nut by placing the middle board on the side board.
③ Put side board on the middle board, put 3 pieces together, and fix No. 1,2 with 20mm bolt and nut.
(Assemble in the order of Side-> Middle-> Side.)
Place the fixed board on both sides and fix the number 3 and 4 with 30mm bolt and nut.
2 step. Assemble the switch board
① Place the spring pin of the spring hinge on the switch board and fix it with 12mm bolts and nuts in two small holes.
② Unfold the spring hinges on the inside of the top plate to align the two grooves and secure them with 12mm hex bolts and nuts.
3 step. Connect the top board and launch board
① Lift the switch board and align the launch board with the groove as shown.
*caution! Be careful not to hurt your hands due to the elasticity of the spring hinges.
4 step. Assemble the side, back and top board
① Secure the bracket to the two side board with a 12mm bolt and nut. (8 total)
*Secure to the inside of the wooden board. (print side is outside)
② Secure the bracket with a 12mm bolt and nut only over the rectangular groove on the back board.
*Secure to the inside of the wooden board. (print side is outside)
③ Assemble by matching the groove of the top and the back.
Insert the launch board into the rectangular groove on the back plate and fix the brackets on the back and top plate with 12mm bolts and nuts.
5 step. Connect the side and front board
① Fit the side board to the groove and fix it with 12mm bolts and nuts.
② Align the groove of the front board with the assembled board and fix it with 12mm bolts and nuts in the bracket.
6 step. Connect the spring and the handle
① Screw the spring onto the finished stickbomb switch.
② Press the spring with the handle and fit it into the square groove.
7 step. Complete and operate the Stickbomb Switch
① Stickbomb Switch Completion.
② Hook your finger on the switch board, pull it until it click, and then press the handle to see if it works.
③ Connect 4 stickbomb sticks. Install the stickboom switch on the dotted line, connect the remaining sticks, and press the handle.
There are no posts to show
There are no posts to show
PLEASE SELECT THE DESTINATION COUNTRY AND LANGUAGE :