PLEASE SELECT THE DESTINATION COUNTRY AND LANGUAGE :
| Self-production |
| 한국 |
| $10.50 |
| $60.00 |
| P00000NR |
  |

| Select item with details above |
| Name | Quantity | Price |
|---|---|---|
| [supsocsem] Robot Arm T2000 Mounting Hydraulic Robot Arm |


|
10.5 ( 60.00) 60.00)
|
Discounted amount of your subtotal will appear when you place your orders.
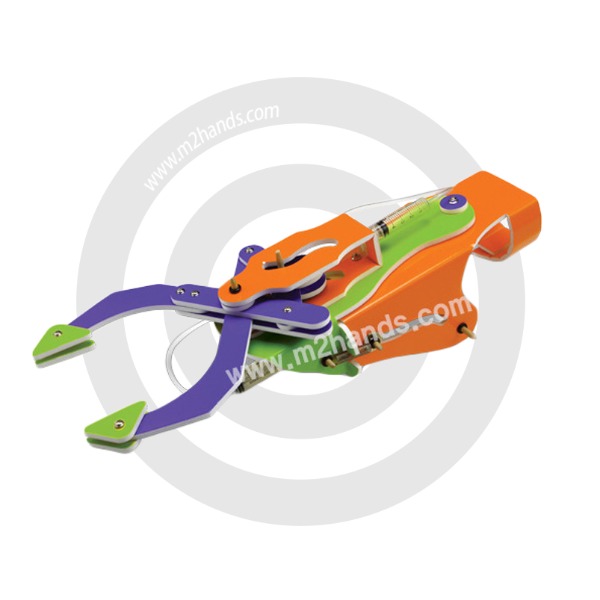
Mounting Hydraulic Robot Arm
"Robot Arm T2000"
Material
styrofoam, plastic, rubber, wooden rods, velcro stainless
Components
main body, auxiliary body, articular fixation plate, syringe connection plate,
partial joint backboard, auxiliary connecting plate, tong plate, velcro, plate washer,
syringe holding plate, rubber ring, syringe fixed rubber ring, nut, bolt, washer
coil spring, syringe 10cc, syringe 5cc, silicone hose, straw, short rod,
middle rod, long rod, syringe pull spring
It has the advantage of experiencing the robot directly on the human body, so you can
understand the principle of the articulated arm
1 step. Assemble the body
① Insert the rubber ring to the end of the fixing rod (3 long ones) so that it does not come off.
② Fold the main body wings slowly.
③ Insert the fixing rod into the wing hole of main body to fix the other side with rubber ring.
④ Insert the syringe fixing board into the groove of the main body to fix it.
⑤ Fold the auxiliary body, hook the spring into the fixing rod (long) and insert it into the auxiliary body hole.
⑥ Fit the main body into the groove in the auxiliary body.
⑦ Rotate the other side of the spring towards the body.
⑧ Fixing the main body and the auxiliary body is tightened with bolts and nuts with the board washer(small).
2 step. Assemble the syringe
① Press both ends of the syringe spring to enlarge the hole and insert it into the 10cc syringe piston.
② Insert the syringe facing forward and fix it with a Syringe fixing rubber ring.
③ Press the syringe piston part firmly and fix the rubber ring firmly.
④ Insert the straw into both sides of the syringe spring.
⑤ (Rubber Ring-> Spring-> Washer-> Main Body Wing-> Washer-> Straw)
Insert it into the fixed rod in the order shown.
⑥ When fixing with rubber ring, fix the washer and body not to stick too much.
⑦ Fold the joint fixation board.
⑧ The joint fixing board should face down with the holes, and fix it with bolts and nuts.
3 step. Assemble the robot arm joint
① Place a 5cc syringe between the two syringe connection boards, connect the main joints and secure them with bolts and nuts.
*The connection of the two joints is different, so they must be assembled in the order shown in the figure.
② Insert the Partial joint front board and the auxiliary connection board between the two joints and secure them with three bolts and nuts.
③ When joining the two joints together, insert the main joint between the partial joints.
④ Look at the pictures and make sure they look the same.
⑤ Insert a rubber ring at the end of the rod (short).
⑥ Insert the rod into the three overlapping holes.
⑦ Insert the rod and fix it with rubber ring.
*If the rubber ring is too tight, it will not work properly.
4 step. Mount the robot arm
① Insert the syringe into the hole of the robot arm fixing board and fix it with a small rubber ring.
(Rubber ring is fixed)
② Fit a rubber ring at the end of the medium rod.
③ (Joint fixing board-> board washer(large)-> robot arm-> board washer(large)-> robot arm fixing board-> auxiliary body)
Insert the fixing rod in this order and fix it with a rubber ring.
④ Fixed rod fitted to robot arm.
⑤ Place two tongs on the main joint and secure them with bolts and nuts.
⑥ The robot arm is finished.
5&6 step. Connecting the Hydraulic Hose & Wrist Rest
① Insert the end of the hose into the end of the syringe.
② Push one end of the piston all the way in, pull the other end completely, and then connect the hose.
③ Fold the wrinkles on both sides of the main body to soften them.
④ Attach the Velcro to the inside of the main body.
⑤ After checking the thickness of the wrist, attach the velcro to the outside of the main body.
⑥ Wrist rest junction view
7 step. Hand Mounting and Operation
① Place the syringe between your index finger and middle finger and place your finger on the handle.
*The robot arm must be open before pulling the rod.
② Pull the handle to see if it works properly.
③ Place a cup or object and try to operate it.
④ The robot arm is operated.
There are no posts to show
There are no posts to show
PLEASE SELECT THE DESTINATION COUNTRY AND LANGUAGE :